Layouts by Millie

I CT For


blog train

Showing posts with label Designs by Sarah. Show all posts
Showing posts with label Designs by Sarah. Show all posts
Thursday, September 12, 2013
your wish

This tutorial was written by Me,on 9/10/13.
Please don't copy it or claim it as your own or post it through any group.
You may link back to my blog.
Any resemblance to any other tutorial is strictly coincidental.
It is written assuming you have a basic knowledge of psp and its tools.
It is written using psp X5 but should work in any other version.
Scrapkit: Eve's Garment, by Designs by Sarah
tube: Elias Chatzoudis
You can purchase it at : Pimp My Tags w/ Scraps

Ok, Ready?
Open a new image, 700 by 700, transparent.Select all.
Paste frame #5 into selection, select none.
Add a new layer, select all.
Paste a paper of choice into selection. select none.
Load the mask, merge the group. Re-size if desired.
Add the magic carpet element as a new layer,Re-size f desired, add a shadow.
Add your tube and © along with your taggers info.
Add the town backdrop as a new layer on top of your tube.
Add any effects you would like to it, I only added a drop shadow.
Now add the lamp element #1 and the smoke element #1. Add a shadow to the lamp. Position the smoke so it looks like its coming from the lamp.
Optional, add smoke #2. And now personalize your tag by adding more elements from the kit.
Merge visible, select all, float the selection and now defloat. Image crop to selection.
Add your name in a scripty font or the one I provided the link for.
Add your favorite text effects.
Re-size all layers checked to 600 by 600.
Save as a png and your done!
Thanks for trying my tutorial. I hope you are happy with your results,
I'd love to see them!
Hugs from Kel

Tuesday, August 20, 2013
Zombie Girlz


This tutorial was written by Me.
On 8/20/13.
Please don't copy it or claim it as your own or post it through any group.
You may link back to my blog.
Any resemblance to any other tutorial is strictly coincidental.
It is written assuming you have a basic knowledge of psp and its tools.
It is written using psp X5 but should work in any other version.
You will need the Pay to use kit, Zombie Girlz, designed by designed by Sarah
You can purchase it at Pimp My Tags W/ Scraps
You will need a tube of choice.
Im using Danny Lee.
This kit was inspired by this tube.
You can purchase this tube at Scraps and the City
You have to have a license to use this tube..
The font I used is Bumblebees
Ok Ready?
Open print #2,Shift + D to duplicate and close the original.
Srlect all, float, de-float and crop to selection. Canvas size 700by 700.
Re-size by 85%, all layers unchecked.
Effects, edge effects and enhance.
Copy and paste print #1 as a new layer,
repeat the enhance and then merge the two layers together.
Paste frame #1 as a new layer and rotate right by 90.
Grab your magic wand and click inside it, to select it.
Expand the selection by 4.
Ad a new layer and paste paper into selection.
Select none and drag below the frame layer.
Add the tube as a new layer and drag it below the frame layer,
position it as desired.
Add a drop shadow and merge the frame, tube and paper layers.
Add the stars and musical notes below the frame layer.
Now add your favorite elements from the kit.
Be sure to add © and your taggers mark.
Add the Zombie and Girlz word arts also.
Grab your text tool and set the font to BumbleBees
Stroke null and background set to a color to match your tube.
Type your name, convert to a raster. Add a white Grad. glow and a drop shadow.
Rotate right by 10.
Type your name, convert to a raster. Add a white Grad. glow and a drop shadow.
Rotate right by 10.
Crop away any excess canvas and save as a png.
and your done!
Thanks for trying my tutorial!
Id love to see your results!
Wednesday, July 31, 2013
Ascension
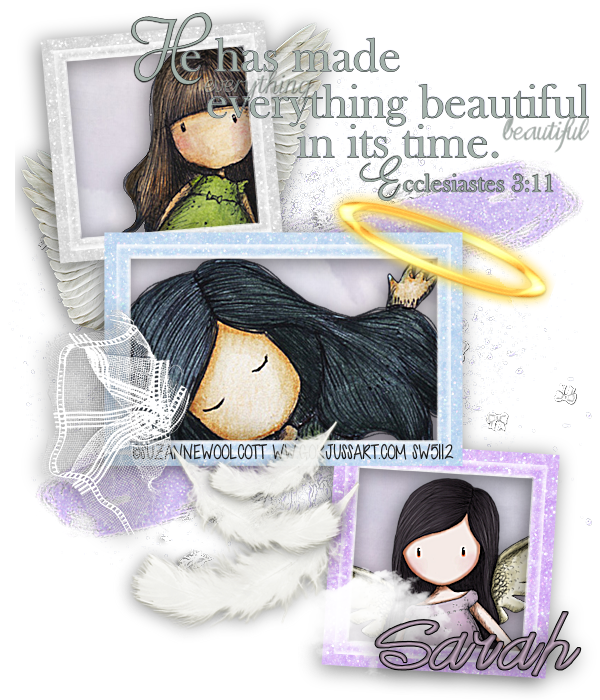
This tutorial was written by Me.
On 7/31/13.
Please don't copy it or claim it as your own or post it through any group.
You may link back to my blog.
Any resemblance to any other tutorial is strictly coincidental.
It is written assuming you have a basic knowledge of psp and its tools.
It is written using psp X5 but should work in any other version.
You will need the Pay to use kit, Ascension, designed by Designs by Sarah.
You can purchase it here,
You can check out her blog Here.
You will need a tube of choice.
Im using Suzanne Woolcott.
You have to have a license to use her tubes or images.
Purchase her tubes here
The font I used is Good Day
I used this word art,
I cant remember where I got this word art.
If you can tell me, please do so I can
give credit where credit is due

Ok Ready?
1. Open a new image, 600 by 700, Flood fill any color, to make it easier to see what your doing.
Some of the elements are very light in color, so I recommend a dark color.
2. Add smear #1, Re-size it by 85%, rotate it left by 20%.
Duplicate it once. On one of these layers, mirror and flip it.
Move the mirrored one to the bottom corner, and the other one goes to the top
in the opposite corner.
3. Add one of the scatters, I used scatter #1. Sharpen it.
4.Add frame #4,
Sharpen.
5 . Grab your magic wand and click inside each of the 3 frames.
Expand the selection by 4.
6. Paste a paper of choice as a new layer.
Invert selection and hit delete on your keyboard.
7. Now add your tubes of choice.
You could also do images, just omit the above step.
Be sure to use tubes or images by the same artist.
8. When you have them positioned as desired, merge the three layers and hit delete on your keyboard again.
Sharpen more, and if you used tubes, add a shadow of choice.
9. Drag the paper layer and the tubes layer below the frame layer.
Add a shadow to the frame layer and merge the 3 layers.
10.Position the elements you have already added to your image.
11. Now add the Halo re-sized to 35%, below the frame layer.
Use your freehand selection tool and select the front part of the Halo ,
You may have to re-do it several times, make sure you only select the front of the halo.
Once happy with the selection, promote selection to layer, drag the promoted selection above the frame layer,
It should look like the halo is hanging on your frame.
If you got some of the back of the halo or didnt get all of the front selected,
undo and try again. When your happy
select none.
12. Add one of the feathers as the top layer, I used feather # 3.
Re-size it by 65%, Add a shadow and position it at the bottom.
Duplicate it, Re-size the duplicate by 75%, mirror.
Repeat the above step once more, so you have 3 feathers that look like they are falling.
13. Add one of the clouds, I used #1. Re-size it by 75% twice.
13. Add one of the clouds, I used #1. Re-size it by 75% twice.
Duplicate it and position them side by side.
One overlapping or however you would like it.
Move it over and above the bottom frame.
Position it and then drag the feathers on top of it.
I re-sized the feather layer again by 85%.
14. Add the lace from the kit, re-sized by 45%. Mirror it and add a shadow.
Position it on one of the frames.
15. Open the wings #1, Use your freehand selection tool, to
select one of the wings and promote selection to layer,
on the original layer, hit delete. select none. Now the wings should be on different layers.
Copy and paste one of them as a new layer, Re-size it by 45%. Sharpen it and add a drop shadow,
Drag it under the frame layer on the appropriate side of the frame.
Repeat with the other wing.
16. Add more elements if desired.
17. Add your word art or type a sentament of choice.
18. Add your name, Mine is size 72.
Add an inner bevel and a drop shadow.
Delete the colored layer.
Delete the colored layer.
19. Save as a png,
And your done!
And your done!
Thanks for trying my tutorial!
I hope you are happy with your results!
Wednesday, July 17, 2013
Fresh Mojito

This tutorial was written on 07/17/2013, By Kelli.
Please don't copy it or claim it as your own or post it through any group.
You may link back to my blog.
Any resemblance to any other tutorial is strictly coincidental.
It is written assuming you have a basic knowledge of psp and its tools.
It is written using psp X5 but should work in any other version.
You will need a font of choice.
And a tube... Im using a tube by Barbara Jensen
You need a license to use her tubes
you can purchase her tubes here
Ok Ready?
1.Open a new image, 700 pixels by 700 pixels.Transparent background.
2. Paste backdrops # 1 and # 2 as new layers. Re-size each by 85%.
Place one on top of the other so that it's overlapping a little.
Merge these 2 layers.
Apply a shadow to both
Apply a shadow to both
Settings : 0,0,50,0,black.
3. Paste frame # 3 as a new layer, Rotate it left by 45 degrees and then again by 20.
4. Now paste the elements you want to use on top of your frame.
I used the:
Tag re-sized to 35%
Sugar re-sized by 35%
Slice # 1
Rum re-sized by 50% and rotated left by 14.
Ribbon #5 re-sized by 75% twice.
Muddler
Mint #2, Re-sized by 75%
Lime # 3 re-sized by 75% three times.
Flowers #3, 2 and, 1 ... All resized by 35%
Drink re-sized by 50%
Banner re-sized by 85%
And the Cupcake resized by 50% and then 75% twice.
Apply the same drop shadow to each element.
5. Once you have your elements where you want them.
Add your tube and ©.
6.Now add your name and your favorite text effects
And your done!
Thanks for trying my tutorial!
I hope you are happy with your results!
Wednesday, June 26, 2013
Firecracker

This tutorial was written on 06/26/2013, By Kelli.
Please don't copy it or claim it as your own or post it through any group.
You may link back to my blog.
Any resemblance to any other tutorial is strictly coincidental.
It is written assuming you have a basic knowledge of psp and its tools.
It is written using psp X5 but should work in any other version.
You will need the scrap kit Cutie Miss Independent.
Its a store collab and you can get it here.
This tut was made using TammyKat Dezigns part.
You can check out her blog Here.
You will need 2 masks of choice.
I used masks from here.
Down the page there is a download link for mask set 1-3 and that is the set I used
You will need a tube of choice. I am using a tube by Elias Chatozudis.
You need to purchase this tube to use it.
You can buy it here
You will also need a font of choice I am using Cutie Patootie.
You can download it for free at Dafont here.
you will also need 2 more fonts for your word art. A fat font and a small font of your choice.
I used eye candy gradient glow. but you can just use a drop shadow if you prefer.
Ok Ready?
1. First open a paper of choice. Shift + D to duplicate it. Close the original.
2. Load your first mask, I think a square mask would work best.
Merge group and re-size the mask layer by 75%.
3. Duplicate the layer and Change the blend mode to Luminance.
4. Add a new layer, select all. Paste another paper of choice into selection.
5. Load your second mask (this time I used a round one).
Merge group, and re-size it by 75%.
7. Paste the stars frame as a new layer. Re-size it a little not much. You want it to overlap the mask layers on both sides.
Add a drop shadow.
8. Add your big tube of choice. Re-size it, position it as desired below the frame layer.Then use your freehand selection tool to select the part of the tube that's peeking out from under the bottom the frame. Hit delete on your keyboard. Add a drop shadow.
8. Add the 3 fireworks as new layers. Re-size each of them by 75% and add a drop shadow to each. Position them across the frame layer (Under the frame layer. Once they are positioned. Merge them down.
9. Paste the White flower or flowers of choice.
Re-size it by 50%. Sharpen it and
Duplicate it 5 times.
Now duplicate one of the flower layers again and re-size it by 85%
Duplicate the smaller flower 3 times.
Position the flower layers as desired. Sharpen each and add a drop shadow to each individual layer.
10. The flowers should be above the frame layer.
When they are positioned as you would like them. Merge the flower layers.
11.Paste one of the ribbons on top of the flower layer. Position it and add a drop shadow of choice.
12. Paste the top hat and resize it to your desired size. With your magic wand click on the red colors of the hat and add an inner bevel.
Select none and repeat with the white parts of the hat. Select none and add a
shadow of choice. Position the hat.
13. Add the triple stars. Re-size, Sharpen and add a drop shadow.
14. Add another tube or two or as many or few as you would like.
Add a shadow to each.
15. With your fat font of choice. Type "FIRECRACKER, FIRECRACKER".
Then choose a small font and type "Boom Boom Boom".
Add your favorite text effects.
16. Using Cutie Patootie, Foreground set to a dark color from your tube. Background null.
Type your name in a bold font.
Add a drop shadow or a gradient glow. Color is another color from your tube.
Then add a droop shadow to the name layer.
16. Add your copywright and taggers mark.
And now your done!
Thanks for trying my tutorial!
I hope you are happy with your results!
Thursday, June 20, 2013
Ahoy!

This tutorial was written on 06/20/2013, By Kelli.
Please don't copy it or claim it as your own or post it through any group.
You may link back to my blog.
Any resemblance to any other tutorial is strictly coincidental.
It is written assuming you have a basic knowledge of psp and its tools.
It is written using psp X5 but should work in any other version.
You will need the scrap kit Called Ahoy!
by Designs by Sarah
Buy it at Pimp my tags/with scraps here
You can check out her blog Here.
You will need a tube of choice. I am using a tube by Jose Cano.
You need to purchase this tube to use it.
You can buy it at Scraps and the City here
You will need a mask of choice.
You will also need a font of choice I am using Shipped Goods.
You can download it for free at Dafont here
Ok Ready?
1. First open a new transparent image 700 x 700.
2. Paste a paper of choice as a new layer. Load a mask of choice and merge group.
3.Paste frame #2 as new layer on top of the mask layer. leave
it in the middle of the tag. Add a drop shadow of choice.With your
rectangle selection tool. Draw a selection aound the openings of the
frame.
Add a new raster layer and paste a paper of choice into the selection.
Select none and drag below the frame layer.
4.Now addd your tube Between the frame and paper layers. Don't forget to add ©. As well as your taggers mark if desired. Merge visible.
5. Now add the elements from the kit that you like. Re-size each and add a shadow to each individual element.
6.Merge visible. Select all, selections float, selections de-float. Go to images and crop to selection.
This crops your tag without cropping any of the layers.
7. Activate the text tool and select your font. Foreground is white
and background is a color of choice.I always set the size of the font
larger than I like and then resize it. When your finished typing your
name. Add your favoritge text effects. I only added an inner bevel.
a drop shadow of choice.
And now your done!
Thanks for trying my tutorial!
I hope you are happy with your results!
American Girl

This tutorial was written on 06/20/2013, By Kelli.
Please don't copy it or claim it as your own or post it through any group.
You may link back to my blog.
Any resemblance to any other tutorial is strictly coincidental.
It is written assuming you have a basic knowledge of psp and its tools.
It is written using psp X5 but should work in any other version.
You will need the scrap kit Called Ahoy!
by Designs by Sarah
Buy it at Pimp my tags/with scraps here
You can check out her blog Here.
You will need a tube of choice. I am using a tube by Jose Cano.
You need to purchase this tube to use it.
You can buy it at Scraps and the City here
You will need a mask of choice.
You will also need a font of choice. My girl is Retro.
You can download it for free at Dafont here
Ok Ready?
1. First open a new transparent image 700 x 700.
2. Open wavws one and two. Paste them as new layers with wave #one on the bottom.Add a drop shadow of choice to both layers. Merge down. Re-size by 70%. Rotate it by 15 degrees. Duplicate it twice. position them down the canvas to make the background layer of your tag.Merge the layers down.
3.Paste frame #1 as new layer on top of the background layer. leave it in the middle of the tag. Add a drop shadow of choice.With your rectangle selection tool. Draw a selection aound the opening of the frame.
Add a new raster layer and paste a tube of choice into the selection. Select none and drag below the frame layer. Merge these two layers together.
4.Now addd your tube and ©, as well as your taggers mark if desired.
5. Now add the elements from the kit that you like. Re-size each and add a shadow to each individual element.
6.Merge visible. Select all, selections float, selections de-float. Go to images and crop to selection.
This crops your tag without cropping any of the layers.
7. Activate the text tool and select your font. Foreground is null and background is a paper of choice.I always set the size of the font larger than I like and then resize it. When your finished typing your name. Add your favoritge text effects. I only added an inner bevel.
Add a grad. Glow from Eye candy or a drop shadow of choice. Color Red or Blue.
And now your done!
Thanks for trying my tutorial!
I hope you are happy with your results!
Ahoy there!

This tutorial was written on 06/120/2013, By Kelli.
Please don't copy it or claim it as your own or post it through any group.
You may link back to my blog.
Any resemblance to any other tutorial is strictly coincidental.
It is written assuming you have a basic knowledge of psp and its tools.
It is written using psp X5 but should work in any other version.
You will need the scrap kit Called Ahoy!
by Designs by Sarah
Buy it at Pimp my tags/with scraps here
You can check out her blog Here.
You will also need a font of choice. I used Impact.
Ok Ready?
1. First open a new transparent image 700 x 700.
2. Activate your text tool.With a fat font of choice, I used Impact which is a font that is already installed in psp. Font size 72. Stroke width 3. Foreground set to a color f choice. Back ground set to null. Type your text. Add an inner bevel of choice and a drop shadow of choice.
3.Grab your magic wand and make your text layer the active layer. click outside of the text and then click selections invert.
Modify the selection by contracting the selection by 2.
Add a new layer and paste a paper of choice into the selection. Drag this layer below the name outline. Select none.Merge these two layers down.
4.Add a new layer and select all.Paste a paper of choice into selection and select none.
Load your mask of choice.Merge group.
5. Add several elements from the kit to your tag now.And your tube and copywright
If needed. I didnt use a tube on this one. I love this ship!
6.Merge visible. Select all, selections float, selections defloat.Go to images and crop to selection.
This crops your tag without cropeing any of the layers.
7. Duplicate the merged tag and on the duplicate layer, go to filters unlimited, aged film.
Apply. make the blend mode a mode of choice.
And now your done!
Thanks for trying my tutorial!
I hope you are happy with your results!
Saturday, June 15, 2013
Fallen 2

This tutorial was written on 06/15/2013, By Kelli.
Please don't copy it or claim it as your own or post it through any group.
You may link back to my blog.
Any resemblance to any other tutorial is strictly coincidental.
It is written assuming you have a basic knowledge of psp and its tools.
It is written using psp X5 but should work in any other version.
You will need a tube of choice.I am using a tube by a friend. If you would like
to be able to use these ubes you can join this forum...
Just tell them Kelli sent you. This is a wonderful artist and she is so generous!
Thanks Patty Ann! And its the best forum out there!
You will not regret joining!
You will need the scrap kit by Designs by Sarah,
Its called : "Fallen"
Its called : "Fallen"
Buy it at Pimp my tags/with scraps here
You can check out her blog Here.
You will also need a font of choice.
I am using Waking up,
You can download it here
Ok Ready?
1. First open a new transparent image: 600 x600.
2. Open frame #2.Copy and paste it as a new image.Re-size it by 50%. Leave it in the middle of the canvas. Use your selection tool set to rectangle. Make a selection around the frame including the bars of the frame.
3. Add a new layer.
Open paper of choice, colorize it to match your tube.Copy it and go back to the tag
your working on. Paste into the selection. Select none and drag the layer below the frame layer.
4. Add a new raster layer to the tag, select all and modify the selection x 10.
Paste The colorized paper into selection and select none. Open mask of choice and load mask from image. merge group.
Open the other mask and repeat the above step only this time just choose a color to match
the tube. Merge group and add a drop shadow to this mask layer.
5. Copy and paste your tube below the frame layer and above the mask layers. Re-size it and apply a drop shadow.Position it. Grab the selection tool and select the part of the tube that you want to be above the frame. Arrange the promoted selection above the frame layer.
Select none. Add a drop shadow to the original tube layer.
6.Merge the mask layers together.
Merge the tube layers and the frame layer together
7.Paste the lights image above the masks layer and position.Merge it to the mask layer.
8. Open the heart frame #4%.
And re-size it again if desired. Colorize it to match your tube and rotate it to the left by 25 degrees.
Sharpen it and add a drop shadow.
9. Duplicate it and re-size it by 75%. Position one heart on either side of the frame.
10. With your freehand selection tool. Select the part of the hearts that are going to be behind your frame.
11. Repeat the step on the second heart.
12. Open the flowers, leaves and bows you want in your flower cluster. Copy and paste them all as new layers. Re-size them all sharpen and add a drop shadow to each element. Make the cluster. When happy with it. merge the layers of the cluster together.
13. Now make your text Waking up,
foreground is null and background is black.
Type your name. Add a inner bevel and drop shadow of choice.
And now your done!
Thanks for trying my tutorial!
I hope you are happy with your results!
Fallen

This tutorial was written on 06/15/2013, By Kelli.
Please don't copy it or claim it as your own or post it through any group.
You may link back to my blog.
Any resemblance to any other tutorial is strictly coincidental.
It is written assuming you have a basic knowledge of psp and its tools.
It is written using psp X5 but should work in any other version.
You will need a tube of choice.Or not.
Depending on what you would like.
I just used the elements in the kit.It just didn't need the tube.
You will need the scrap kit by Designs by Sarah,
Its called : "Fallen"
Its called : "Fallen"
Buy it at Pimp my tags/with scraps here
You can check out her blog Here.
You will also need a font of choice.
I am using On the left,
You can download it here
Ok Ready?
1. First open a new transparent image: 600 x600.
2. Select all and then go,
selections modify and contract by 10.
Copy and paste a paper of choice into selection. Select none.
3. Open mask 3 and go to layers new mask layer and add mask from image.
Click on the mask you just opened in the drop down menu.
Merge group.
Duplicate it and go to layers properties and make it darker.
4. Open frame number 2. Copy and paste it on top of the mask layer.
Re-size it by 75%Leave it in the middle of the canvas.
5. Open flower #6. Copy and paste it as a new image, Re-size it by 50%
Go image rotate and rotate the heart to the left x 25 degrees.
Position it in one of the top corners of the frame.
6.Open one of the clouds and paste it as a new layer. Re-size it
and position it as desired.
7.Open heart #7.Copy and paste it as a new layer.
Re-size it x 35%Sharpen more and add a drop shadow of choice.
My settings were: 2,-2,40,4,black.You could rotate it if you want.
8. duplicate it and reosize the duplicated heart by 75%. And now duplicate the smaller heart again and re-size it again by 75%. Position the hearts as desired.
9.Open the clock and paste it as a new layer. Re-size it x 50%. position it as desired, or leave it in the middle. Duplicate the clock and merge down to make the clock darker.
9. Now open print #2. Re-size it to desired size. Copy and paste it onto the canvas above the
frame layer and below the hearts layer.
10. Now open the Pegasus image, Or your tube of choice. Don't forget to add ©.
Copy and paste it as a new layer. Resize by 75%.
Add a drop shadow of choice.
11. In a couple different fonts. Type "Dream a little Dream."
Add your favorite text effects now.
15. Now make your text on the left
foreground is null and background is black.
Type your name. Add an inner bevel and drop shadow of choice.
And now your done!
Thanks for trying my tutorial!
I hope you are happy with your results!
My dream

This tutorial was written on 06/15/2013, By Kelli.
Please don't copy it or claim it as your own or post it through any group.
You may link back to my blog.
Any resemblance to any other tutorial is strictly coincidental.
It is written assuming you have a basic knowledge of psp and its tools.
It is written using psp X5 but should work in any other version.
You will need a tube of choice.I am using a tube by Rachael Tallamy.
You need a license number to use her tubes.
You can purchase it one at Up your Art Here
You will need the scrap kit by Designs by Sarah,
Its called : "Fallen"
Its called : "Fallen"
Buy it at Pimp my tags/with scraps here
You can check out her blog Here.
You will also need a font of choice.
I am using Visual Magnets,
You can download it here
You also need your choice of the dream word art here
Ok Ready?
1. First open a new transparent image: 600 x600.
2. Add a new Raster image. Select all and then go,
selections modify and contract by 10.
3. Open mask 3 and copy and paste it into selection. Select none.
4. Open print number 2. Copy and paste it on top of the mask layer.
Re-size it and then position it on the mask as you like.
5. Open frame number 4. Copy and paste it as a new image, Re-size it by 35%
Go image rotate and rotate the heart to the left x 15 degrees.
Now duplicate it and mirror it.
6.Place one heart on top of the other. Grab your selection tool set to freehand.
Make a selection on part of the top heart at the bottom. You want
it to look like the hearts are linked together. Once you have the selection
Go to layers and promote selection to layer.
7.Move the promoted selection layer under the bottom heart on the layer palette.
now back on the top heart, hit delete on our keyboard.
Select none. Merge down the hearts and the promoted selection. Re-size it by 65%.
Sharpen it and add a drop shadow of choice.
8.Open ribbon #2. Copy and paste it as a new layer.
Re-size it x 75%. Repeat if desired.
Place it at the bottom of the canvas. Sharpen and add a drop shadow of choice.
9. Now open a flower of choice. Re-size it to desired size. Copy and paste it onto the canvas above the ribbon layer. Position it at the end of the ribbon.
Duplicate it and re-size the[duplicate x 75%,
Duplicate it and re-size the[duplicate x 75%,
position it beside the first flower. Duplicate the duplicate one
and resize it. Arrange them in a line. Sharpen each and add a drop shadow to each layer.
10. Now open one of the leaves or both if you would like.
Copy and paste it as a new layer. Re-size it as you did the flower.
Duplicate it twice so you have 3 leaves. Position them with the flowers.
Drag some under and move some to the top of the flowers.
When they are arranged as desired. sharpen the leaves
and add a droop shadow. Merge the leaves and flowers down.
11. Now open ribbon #4. Copy and paste it as a new layer, Re-size it and place
it on top of the flowers.add drop shadow.
it on top of the flowers.add drop shadow.
12. I also added the name plate ribbon on top of the flowers cluster.
13. Add your word art of choice. Add any
effects you would like to the word art.
14. Copy and paste your tube of choice now and add your ©.
Add a drop shadow to your tube.
15. Now make your text visual Magnets
foreground is null and background is color of choice.
Type your name. Add a inner bevel and drop shadow of choice.
I duplicated the name layer to make the name darker and merged both layers
before adding the bevel and shadow.
And now your done!
Thanks for trying my tutorial!
I hope you are happy with your results!
Subscribe to:
Posts
(Atom)
My Blinkie
